Settings
Settings can be created as a way to store data about this installation or about each user such that that data can be accessed later during Field Mapping or during Workflow Configuration. User and Site properties are simple name/value pairs whereas Site Lists are a name=>value list arrangement. Some special names are reserved and are used in system configuration
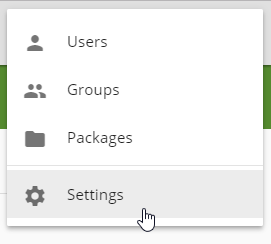
To access settings, when logged in as an Site Administrator, click the gear icon in the navigation toolbar, then click Settings.
- Site Properties - are global name/value pairs. This might include information about your document management system login for example. A few specifically named site properties are also used in system configuration and are described below Settings#Reserved Site Properties
- Site Lists - are global name=>values lists arrangements. This might be a list of office locations for example.
- User Properties - are properties assigned for each user in the site. You can optionally configure a user property to be editable by the user themselves on their user profile screen.
Site Property
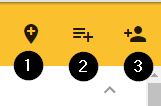
To create a new site property,
- click on the site property button identified as #1 in the graphic above
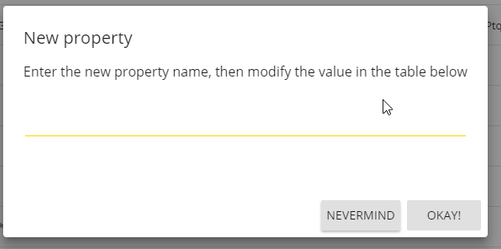
- in the popup dialog, assign a name to the property and click OKAY
- Now your new property is added to the list. Click on the value section in the middle to set your value:

- Type in the property value and press save

Site List
Site lists are created the same way as site properties. Just kick off the process with the list button identified as #2 on the yellow toolbar graphic above. Once the list has been created, it will appear as tab in the site lists dialog.
Editing a property
Click the blank area next to a property name if it doesn't have a value. Enter a value in the dialog then click save. If the property already has a value, click the value to modify. For list properties and user properties, there is a tab for each property, along with a table listing the configuration for each property.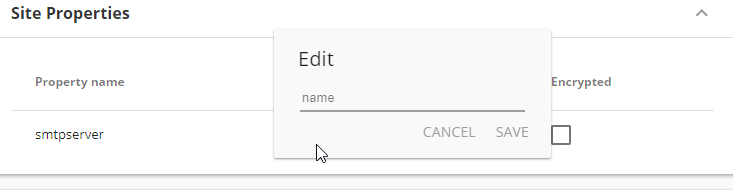
Property Update Spreadsheets
For list properties and user properties, you can download a spreadsheet with specific formatting. Use your local spreadsheet application to fill in the correct values, then upload the spreadsheet back into the system to update all properties based on the new values in the spreadsheet.
Once the list has been created, you can:
- See the title listed as a tab and choose among the different lists
- Add a new item to the list
- Download a CSV spreadsheet of the list content for local modifications and
- Upload your modified spreadsheet so that the list values can be updated
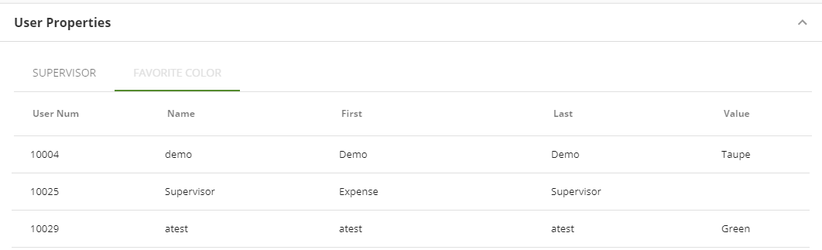
User Properties
User properties are shown as tabs wherein each user is listed with the property value. In the example below, you can see user name, first name and last name followed by the value for the "Favorite Color" custom user property:
The user's value for a particular custom user property can be seen on their User Profile page and it can be used as String Builder content in Workflow Configuration or in Field Mapping. Additionally, if you would like for the user to be allowed to modify their value for a particular User Property, just check the "Is this property User Editable?" checkbox at the bottom of any of the User Property tabs![]()
Reserved Site Properties
A few of the site property names are reserved since they are used for system configuration options. Those are enumerated here:
- smtpserver - use this to configure outbound SMTP server name
- smtpport - outbound SMTP server port
- smtppassword - outbound SMTP user password
- smtpuser - outbound SMTP user name
- smtpssl - outbound SMTP using SSL? 0/1 or false/true are valid
- smtpfrom - outbound SMTP from user address
- enableoffline - does this installation allow Offline Packages
- outputroot - this must be configured by a KeyMark server administrator. This will be the root location under which workflow is allowed to write content to disk
- esriclientid - this is used for an ESRI integration. Get this information from your ESRI provider by following these instructions ESRI ArcGIS Online Token Request
- esriclientsecret - this is used for an ESRI integration. Get this information from your ESRI provider by following these instructions ESRI ArcGIS Online Token Request
- enableconnector - this is used to enable the connector for licensed users. Get more information here.
- distributionserverpath - this is used to enable the mail distribution service.